Mississauga Kitchen Remodel: Rewiring, Self-Built Maple Cabinets
The short version
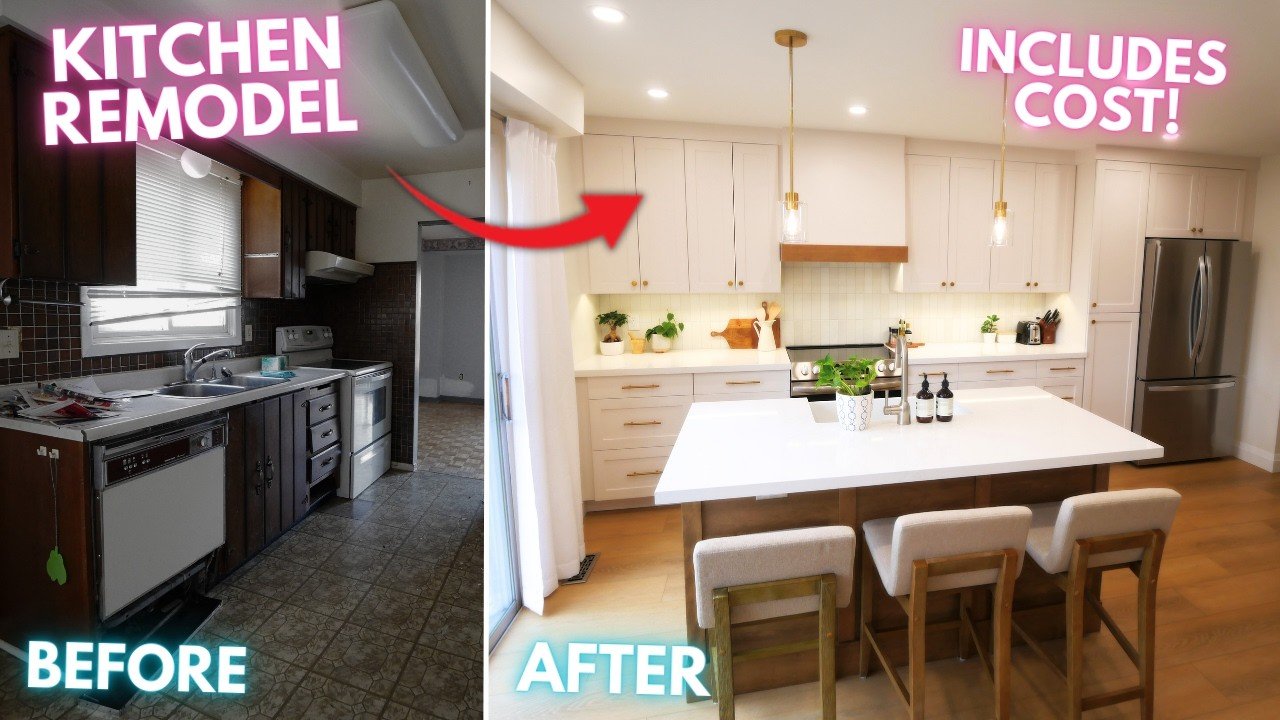
A Mississauga homeowner and retired electrician converts a 1970s semi-detached house's old living space into a new kitchen. The video covers demo, framing, HVAC, plumbing and electrical rough-in, drywall, ceilings, subfloor, self-built maple cabinets, flooring, backsplash and painting the cabinets after the stain turned out blotchy. Material cost is given as about $13,000 USD or $17,450 CAD.
Full written account
Why would a retired electrician gut a 1970s semi-detached house and start the kitchen from scratch?
In a 1970s semi-detached house in Mississauga, the creator of Workin' with Wolkon turned an awkward living space into a new kitchen. The old kitchen sat in a corner behind two load-bearing walls, and the living room had no good place for a TV and couch. A SketchUp design put the couch in a corner, the kitchen where the living room had been, and left a formal dining room that has become a Dungeons and Dragons room. Material cost was about $13,000 USD (about $17,450 CAD), and the creator says that as part of a larger house renovation those figures are rough estimates. He had never built cabinetry or done a kitchen before.
Demo and framing
Whole-house demo took about a week with a rented 40-yard bin. The old cabinets were water damaged and full of rodent droppings, so they were thrown out, and a person was hired to take the appliances. The worst job was the parquet flooring, which had so much adhesive that it came up in messy pieces over a couple of days with a 3 ft pry bar. He says renting a tool would have been easier.
A new 2×4 wall was framed to carry the cabinets and the mechanicals. It sits against a block wall shared with the neighbour. Two duct boxes were removed to push the wall back: the water heater vent, solved by replacing the roughly 20-year-old heater with a power-vent model, and a forced-air duct, rerouted through a new box in another living room wall. Because the joists run parallel to the wall, blocking was added above for fastening. The floor and ceiling framing was uneven, so most studs were cut individually and built in place.
Mechanicals
- Range hood duct: 6 in. rigid duct through the stucco, with a screwed-on exterior cover sealed in silicone except at the bottom so water can escape, and spray foam where it enters the house.
- Return air: an existing floor return where the fridge would go was covered and relocated to the wall of the new dining room.
- Drains: a 2 in. line was run through the unfinished basement, with a stub for the island sink and one for the dishwasher, capped for testing. Both are vented with air admittance valves. He says he should have run a real vent for the dishwasher since the wall was open.
- Water: PEX type A with expansion fittings: hot and cold to the sink, hot to the dishwasher, cold to the fridge.
- Electrical: the house had aluminum wiring, so he rewired it all in copper, which he says took two to three days and about $1,000 in materials. The kitchen has dedicated circuits, including countertop receptacles on a 12 to 20 amp circuit, a stove receptacle, and fridge, dishwasher, microwave and range hood circuits. Metal device boxes have built-in clamps, while the larger stove box needed a 3/4 in. plastic connector. Under-cabinet lighting runs from a 120 V switch feed to a driver that outputs 24 V DC. He calls the number of pot lights his biggest regret and says a dimmer helps.
He built a deep upper cabinet with its own circuit that could fit a microwave, but says he would never do it, because a microwave is not supposed to be tucked into a closed cabinet.
Walls, ceilings and floors
Shared walls got Sheetrock Safe and Sound, which he says eliminates sound transfer to the neighbours. Painted popcorn ceilings were sanded with a Festool sander on a HEPA extractor, and 24 grit was needed because 36 grit did not get through. The ceilings were sealed, skim coated with one coat of rolled mud by a worker on stilts, sanded, primed with Cover Max, and sprayed with ProMar ceiling paint. Walls are Sherwin-Williams Alabaster, Emerald line, satin.
The existing subfloor felt like a trampoline, so 3/8 in. plywood went over it with subfloor glue and crown staples. Self-leveler was then screeded with a straight edge rather than just poured. The flooring is Curate Taiga luxury vinyl plank in Oak Natural, 9 in. wide with a 20 mil wear layer, installed throughout in a day with no transition strips.
Cabinets and finishing
He spent a couple of weeks, maybe nearly a month, building the cabinets from 3/4 in. maple plywood. He laid out the wall with a laser and chalk line and checked level and straightness across the gap for the stove. Large filler strips were needed. The island is three boxes fastened together and screwed to 2x4s on the floor, with an apron sink cutout. The range hood is a 2×4 frame covered in drywall around an insert, with a sloped top and mitered maple trim. Flat stock bridges the uppers to the ceiling, brad nailed.
Maple proved hard to stain: the doors came out blotchy and too dark, so everything was sprayed white with Sherwin-Williams Gallery line paint over Extreme Bond primer, and the black hardware was swapped for gold. The countertops are Hanstone quartz with mitered edges, installed by a countertop company in a few days, which meant the sink drain had to be disconnected. The backsplash is white Artisan tile in a stacked pattern, laid off a ledger board, with light gray grout. Under-cabinet LED tape sits in an aluminum track routed into the cabinet bottoms.
Questions this video answers
How much did the materials cost?
The description gives about $13,000 USD, or about $17,450 CAD, for materials.
Why were the cabinets painted?
The maple doors stained blotchy, so they were sprayed white with Sherwin-Williams Gallery Series paint.
What flooring was used?
Curate Taiga luxury vinyl plank in Oak Natural, 9 in. wide with a 20 mil wear layer, floating over a leveled subfloor.
What would he change?
He would use a panel-ready fridge, a separate wall oven and cooktop, and fewer pot lights.
Explore related projects
Connected by the topic: Cabinets and countertops