Fireplace Built-ins From Unfinished Wall Cabinets and Beadboard
The short version
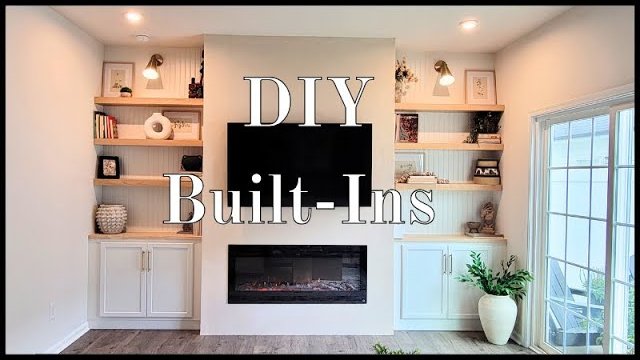
Part 2 of a fireplace project shows how built-ins with storage were added beside a fireplace. Unfinished wall cabinets were used instead of base cabinets, with cabinet fillers, beadboard back panels, butcher block countertops, primer, cabinet paint, brass pulls and store-bought floating shelves. The creator also shares mistakes to avoid, such as using a painting tool to apply wood filler and leaving the cabinet doors on.
Full written account
Base cabinets average about 24 in. deep, and that is why the built-ins beside this fireplace were made from unfinished wall cabinets instead. The creator of At Home With Lady Cinnamon wanted the storage recessed from the fireplace, and wall cabinets had the right depth. The video is part two of a fireplace project; part one covered constructing the fireplace itself.
Starting with the cabinets
Supplies came from a big box store, and her husband made bases for the storage. Before the shelving goes in, she says to remove the baseboards so the cabinets lie flat against the wall. The listed cabinets are Hampton Bay unfinished wall cabinets, 36 in. wide, 12 in. deep and 30 in. high. Gaps between cabinets and the wall or another cabinet are covered with cabinet fillers, listed as 3 in. wide and 36 in. high. Her money-saving tip is to skip prepainted cabinets, because unfinished ones save hundreds of dollars per cabinet and can be painted any color.
Back panel and countertops
A back panel is not required when using floating shelves, but she used it for texture and chose beadboard to give a modern room a traditional feel. The built-ins and the fireplace both run floor to ceiling, which she calls a preference. Unfinished butcher block serves as the countertops, and the only prep she mentions is adding a little oil.
Filling, priming and painting
The wood filler is color-coded: it goes on pink and turns a lighter beige when dry. After that it is sanded with a fine-grit sandpaper so the paint finishes smooth. She admits to two mistakes. She used one of her painting tools to apply the filler instead of a spatula or putty tool, and she did not remove the cabinet doors, which would have been easier at the prime and paint stage. A gap in one area was to be closed with paintable cork.
She primed with two coats of Bullseye 1-2-3, covering the inside and outside of the cabinet doors and the beadboard back panels. The paint is Sherwin Williams Emerald Urethane Trim Enamel, applied with a foam brush, which she says leaves no texture or brush marks. The cabinets came with shelves, which took about 30 seconds to install. Brass pulls were added afterward.
Shelves and sconces
The floating shelves were bought from Pottery Barn rather than built. She had planned on white oak but they had white ash, which matched the oiled countertops. They were on sale, and she says building them would have cost more. Her husband mounted them with a level and a screw gun, finding studs with a stud finder. Brass sconces were added on top.
The fireplace finish
The fireplace was left unfinished for a time because she could not decide among brick, tile or stone. She settled on Venetian plaster, which she applied herself but did not film. She describes the texture as feeling like soft leather. The project was filmed a year before the video was edited and released.
Questions this video answers
Why did the builders use wall cabinets instead of base cabinets?
Base cabinets average about 24 in. deep, and the creator wanted the storage recessed from the fireplace. Wall cabinets had the right depth.
How do you fill gaps between cabinets and the wall?
The video uses cabinet fillers, which are sold at the home center.
How can you save money on cabinets?
Buy unfinished cabinets instead of prepainted ones, which the video says saves hundreds of dollars per cabinet and lets you choose your own color.
What was used for the back panel?
Beadboard, chosen for texture. A back panel is optional when using floating shelves.
How were the floating shelves mounted?
With a level, a screw gun and a stud finder to locate the studs.
What mistakes does the creator warn about?
She used a painting tool to apply wood filler instead of a spatula or putty tool, and she did not remove the cabinet doors before priming and painting.
Explore related projects
Connected by the topic: Build built-in bookshelves