Basement Stair Remodel Over Carpet Stairs With Pine Plywood Treads
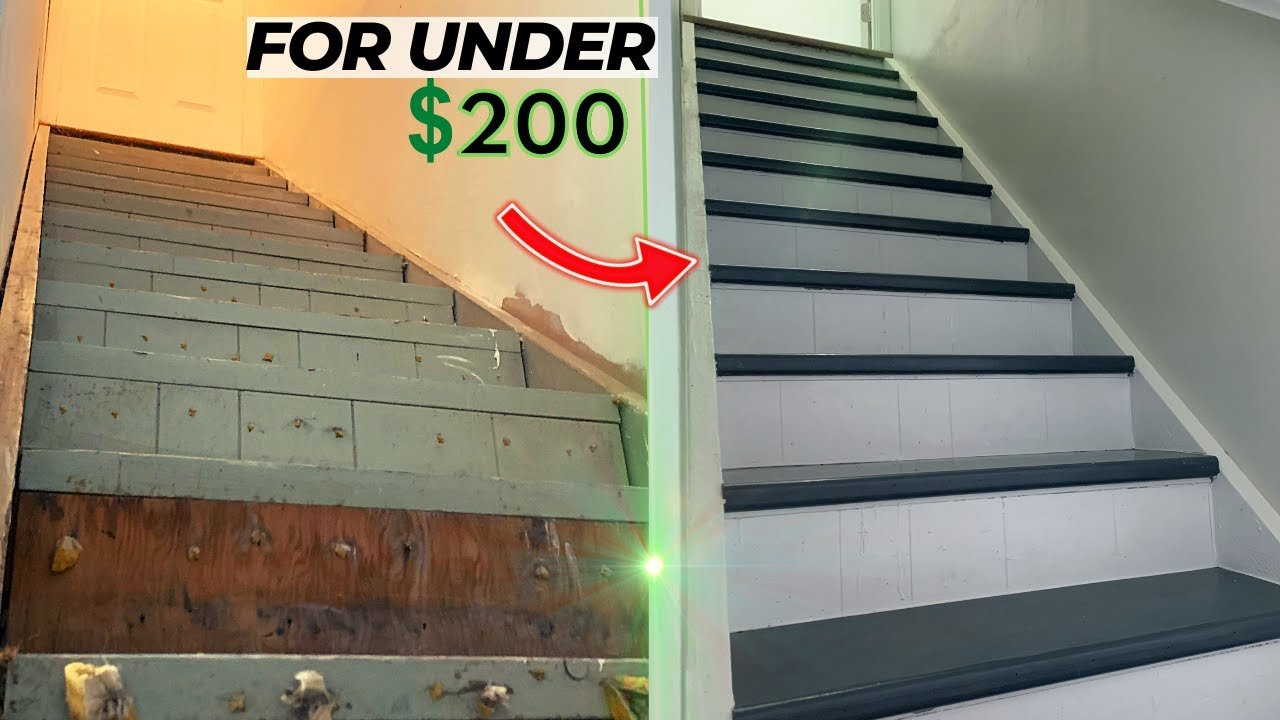
The short version
A homeowner turns a carpet-stripped basement staircase into a finished one by laying 1/4 in. pine plywood treads over the existing treads, adding routed pine bullnose nosing, then staining and sealing with polyurethane. Existing risers are painted, and the bottom step gets a new hardboard riser. The video states the materials came in under $200, and notes the blotchy stain caused by leftover wood glue and the concern that pine will dent.
Full written account
A basement staircase stripped of its carpet was rebuilt for under $200 in materials, using quarter-inch sanded pine plywood laid directly over the existing treads. The plan had been oak plywood, but the local Home Depot only had pine, and that choice shaped the rest of the project.
Preparing the stairs
The carpet had been held down with a large number of nails, screws and staples. The homeowner pulled them with a screwdriver and pliers, and found the staples under the nosing the most uncomfortable to remove. The handrail came off to be sanded and painted outside, and the stairs were vacuumed. The stringers were caulked against the drywall and painted before the treads went on, using a paint sprayer, though a brush works.
Treads and nosing
Each tread was measured individually, at several points, because the staircase varied from step to step. Strips were cut from a 4×8 sheet of plywood with a circular saw run along a clamped straight edge, offset by the distance between the saw and its guide. This is a substitute if you lack a table saw. Each new tread was dry fit, then set in construction adhesive on the old tread and fixed with brad nails, flush with the existing riser.
The nosing came from 1×2 pine, shaped with a router and a 3/4 in. roundover bit on both sides, with a respirator on. It was cut to length with a miter saw, glued with wood glue and brad-nailed. It should sit flush with the tread or slightly higher, since it can be sanded down, whereas sanding the thin plywood tread would be the alternative.
Stain, and the glue mistake
Wood conditioner went on first, then Varathane stain applied with a cloth. The stain came out extremely blotchy where the nosing met the treads, because wood glue had not been fully wiped off. Gel stain, which sits on top of the wood, was applied over the original stain and gave a uniform look, though the color was not the creator's favorite. Three or four coats of polyurethane followed, since pine is soft and dents easily.
Risers and finishing
The existing risers were reused and painted. The bottom step had no riser, so a 2×6 was screwed in and leftover cabinet hardboard was cut and attached with construction adhesive and brad nails. Joints between risers, treads and stringers were taped and caulked, and everything was painted in white semi-gloss. LVP flooring and trim at the new riser were left for later.
Looking back, the creator would use hardwood plywood, and says buying pre-made treads might be worthwhile. The pine was cheap, but there is concern it will not last long, though the photos shown were taken after a year.
Questions this video answers
How much did the stair remodel cost?
The video says it was done for under $200 in materials.
What are the treads made from?
Quarter-inch sanded pine plywood, because the store had no oak plywood.
Why was the stain blotchy?
Wood glue left on the treads and nosing blocked the stain evenly soaking in. Gel stain applied over the top gave a uniform look.
How are the new treads attached?
With construction adhesive on the existing tread and the underside of the new tread, plus brad nails.
What would the creator do differently?
Use hardwood plywood, and consider buying pre-made treads, since pine is soft and may not last.
Explore related projects
Connected by the topic: Carpentry

